Recent Updates Toggle Comment Threads | Keyboard Shortcuts

  • Jay Benedict 11:53 AM on May 6, 2013 Permalink | Reply  

    The Leap to Online Assessment (Part 2 of 2) 

    Here at Buena Vista University we utilize Respondus Lockdown Browser, a secure browser integrated with our LMS.  Once in an exam the user cannot right click, copy/paste, access other programs or move about on their device.  Simple. Hop into the exam, complete exam, leave exam. No other resources. You may ask “But what if they are at home or in their dorm?  Can’t the go get another computer or a book?”  Yes they can.  Good point.  Look at posing questions that make the students apply knowledge not simply regurgitate.  That should help.

    How do I distribute it?

    Commonly through your LMS.  However, some faculty decide to utilize other tools, like Turningpoint to give exams.

    In the end, you will need to find what works for you. Technology can be suited to meet almost every need.  Worst case, it doesn’t help and you go back to the method that works.  Best case, it meets your needs and exceeds your expectations, empowering you to become a better educator!

     
  • Jay Benedict 11:11 AM on April 30, 2013 Permalink | Reply  

    The Leap To Online Assessment (Part 1 of 2) 

    The move to online assessment may be one leap that some educators are hesitant to take.  Odd?  Not really.  There are a lot of factors for faculty to consider. While developing content for f2f, online, or hybrid courses, suggestions made towards providing traditional assessments in an online format are met with at least casual apprehension, and at most, resistance. It may be helpful to look at a few of the common questions.

    Is it more work to create?  It will always take more up-front time to create your assessment material.  Chances are you are typing out your exams anyway, so whether it is for an online assessment or traditional paper makes little difference.  If using a learning management system, chances are you can re-use an assessment indefinitely, saving time, money and trees.

    Is it easier to take?  Those comfortable with or open to using technology shouldn’t encounter any barriers.  It can take those less savvy some time or convincing to do it, but I rarely hear of students asking for a paper copy when provided with the option of traditional vs. online exams.  Filling out an essay by hand can take time compared to typing, which a majority of learners can do much more quickly than write by hand.

    Is it easier to grade?  Most definitely.  Questions with definitive answers (true/false, multiple choice, matching, ordering, to some level, fill-in-the-blank) can automatically grade themselves.  Essays and short answer questions will still require an instructor’s attention to grade, something you would do regardless of whether it’s a traditional or online exam.  I have had instructors who set up all of their exams online in our LMS before the start of the term.  Short of grading essays, they were done grading their assessments before the semester begins.  It may worth mentioning that many LMS assessment tools will let you grade question by question, as opposed to one student at a time.  A huge time-saver.

    Wouldn’t it be easier for students to cheat?  How can I keep my exam from being copied/distributed?  If someone wants to cheat bad enough, the will probably find a way.  That being said, there are an abundance of measures an instructor can take to eliminate this issue, or at least make it harder to accomplish.  In our current LMS, ANGEL, you can randomize the order of questions, as well as the order of the provided answers insuring no two exams are alike.  Take it a step further.  You may want to pool questions.  For example; twenty random questions from the chapter #3 question bank, thirty from chapter #4.  Now randomize the order they are given and the answers.  Fifty questions and no two look alike.  Another idea would be to incorporate open-ended questions that require them to think critically or relate the materiel to their life/work.

    To be continued…

     
  • Chris Anderson 8:40 AM on February 11, 2013 Permalink | Reply  

    The Future of an LMS CMS in the… 

    The Future of an LMS/CMS in the Higher Ed Classroom

    There are varying accounts of what the first LMS was; regardless, by 1985 the LMS CECIL was released.  The University of Auckland in New Zealand adopted it and still has it in place today.  It was, and still is a web-based LMS allowing users to share documents, submit assignments and take tests.  It is now 2013, and the functionality of an LMS has only slightly changed – mainly due to the introduction and accessibility of mobile devices and their capability.

    lms

    Components of a LMS

    What does this say?  Either the functionality of the original LMS was far beyond its time or the use of the LMS in the higher ed classroom hasn’t evolved.  I certainly hope it is more the fact that the core functionality of the original LMS was timeless.

    This brings up a great question.  What are we doing in the higher ed classroom of 2013 to push the envelope?  What are we doing to leverage to functionality of the current LMS?  Hopefully we are extending and enhancing our students’ experience by utilizing the functionality of the current LMS with tools that are readily available via the internet or the other tools that our students are equipped with.

    If you are looking to better utilize the LMS and take the technology that is at our disposal to the next level, contact the TLTC.

     
  • Adam Chown 4:50 PM on March 19, 2012 Permalink | Reply
    Tags: , avid, Avid Studio,   

    Avid Studio for iPad 

    Being interested in video production, I was pretty excited to try Avid’s iPad video editing app, simply called “Avid Studio.”  I’ve used Avid Media Composer, as well as other video editing programs on both Windows and Mac OS, but up until now I haven’t found an editor for the iPad that I really like.

    My experience with iMovie wasn’t a bad one, it just wasn’t what I was looking for.   It’s a pretty straight-forward app, but I’m looking for more of a traditional timeline-based editing app resembling what I’ve been spoiled by on Windows and Mac OS.  While it’s not perfect, Avid Studio is definitely a step in the right direction.

    Upon starting the Avid Studio app you will have the choice of opening an existing project or creating a new one. Simply create a new project and the app will then build the media library out of your photos, videos, and music, which can take a few seconds.  Then you’re off.

    Though it doesn’t feature a full-blown editing timeline, what it does have works pretty well.  I have to keep reminding myself that I’m editing on a tablet, not a monster workstation.  There is one video track (with a built-in audio track) along with three additional audio tracks, which is a nice feature for doing more in-depth audio.  I would like a second video track because that’s what I’m used to, so I’ll dream of that addition some day.  Like I said, I’m spoiled.

    The interface is intuitive for using on the iPad.

    • Double-tapping and dragging are nicely used for putting media into the Storyboard or Timeline.
    • Once media is on the timeline double-tapping, or tapping the wrench icon, brings up the video’s properties where you can set audio level as well as audio fade in and fade out.
    • There is also a razor tool for cutting on the Timeline.
    • The garbage can icon removes the selected media from the timeline.
    • And, of course, there are undo and redo buttons…of which I’ve made plenty of use.

    Video clip selection was easy to figure out; you may preview a clip and adjust the in and out points by dragging the handles on either side, or you can put the clip straight to the Timeline and adjust the handles that appear below the media tracks.

    There is the option of using photos, with a handy montage feature if you want to go nuts with them.  Music is also easily added from your Music library (obviously you’ll want to be careful of copyright violations here).  There is a choice between two video transitions: a crossfade or fade out/fade in.  And no video editor would be complete without a Titles tool.

    Sharing straight to YouTube works just like I expected.  You can also share to Facebook or email your video, as well as save as a Video File.  There is also an option to export your project to be used with Avid Studio for PC, something I don’t have, so I couldn’t try it out.

    I did experience some crashing of the app, but it’s not surprising for a new release.  I never lost any progress from the result of a crash so I’m still a happy camper.  I’m guessing Avid will be working on stability in the future.

    Overall Avid Studio is the app I will be recommending to anybody who asks me what video editor they should be using on the iPad…wink, wink, nudge, nudge to anybody interested in entering the TLTC’s Show Us Your Stuff Contest.

     
  • Adam Chown 2:51 PM on August 5, 2011 Permalink | Reply
    Tags: 360, , ipad 2, iPad apps, panorama   

    360 Panorama for iPad2 

    There are some great apps out there fully realizing the potential of the iPad camera, one of which is “360 Panorama,” by Occipital.  360 Panorama lets the user take a 360-degree snapshot, save it, then easily share it.

    Taking the 360-degree picture is straight-forward and simple; by panning the iPad in a tight circle, the app captures the user’s surroundings.  In a daytime environment we in the TLTC have found that an image can easily be done in under 30 seconds.  Indoors, with less light, capturing is a bit slower, but the app still provides a great result.

    Capturing is intuitive and easy.

    Saving the image is as easy as tapping a button, which saves to the iPad’s camera roll.  The resulting picture can be viewed in the 360 Panorama app in 360 or stereographic views.

    Uploading is equally easy.  This is also where the fun starts.  Uploading to Occipital’s “360verse” makes the image available to the public.  This is where users around the world can share their 360-degree images.  Feel free to take a look at the Noteworthy Panoramas as the bottom of the 360verse page.

    I can see 360 Panorama being used in many academic-related real world settings:

    • A prospective student could visit a virtual university campus
    • Travelers could get an idea of what to expect on a trip before stepping foot out the door
    • An art student could post his or her show online for friends and relatives who are unable to experience it first-hand
    • Panoramas can be embedded into ANGEL pages, so instructors could enhance the context of an assignment with a 360 panorama
    • Students could capture momentous occasions, such as graduation or a big playoff game

    Compare the quality of this image to the 360 Panorama "View from Midfield"

    Overall, I think 360 Panorama is a great app and I definitely recommend it.  The only drawback I have noticed so far is that image quality is noticeably reduced when uploaded, but it’s not surprising since I expect images to be compressed when uploaded.

    Sharing is easy; embed code and URLs can easily be obtained, or users may opt for sharing straight from the app by email, or over Facebook and Twitter.

    Check out some of the 360 Panoramas we in the TLTC have done:
    Construction on football field
    View from midfield
    Construction on Pierce and White halls

     
    • Sarah Jane 1:56 PM on August 10, 2011 Permalink | Reply

      Hey Adam!

      Thank you for the great review! Be sure to keep an eye on your uploaded panoramas, as the quality will actually improve over time as our algorithms go to work on your uploads. You can read more about the process here: http://blog.occipital.com/2011/06/22/your-panoramas-gpu-enhanced/

      Thanks again for the review! We appreciate it!

      Sarah Jane | Community Manager | Occipital

    • Adam Chown 1:45 PM on August 11, 2011 Permalink | Reply

      Sarah,

      Thanks for the update on uploads. That’s awesome to hear!

      Adam

  • Steph Frank 10:15 AM on July 15, 2011 Permalink | Reply
    Tags: atomic learning, help guide, tutorial,   

    Get Your Tech Questions Answered with Atomic Learning! 

    It’s a familiar situation for many.  You are sitting at the computer wondering how to fix that formula in Excel, or install a new plug-in to your browser.  Sure, you could Google it, but then you would have to weed through hundreds of websites and pages of text before you (hopefully) find the answer.  Where is that easy button when you need it?

    Now, help is just a click away.  Atomic Learning is a website where you can easily find answers to any technical question by narrowing down the search or by choosing a topic and browsing all tutorials on the subject.  Best of all, the answers all come in video format that are approximately two minutes or less!

    Want the low down?  Here’s what Atomic Learning offers:

    • Put in a broad search to find tutorials based on subject
    • Put in a narrow search to get a very specific tutorial
    • Browse workshops to get tutorials on grouped subjects (such as blogging, power point presentations, effective online discussions, etc)
    • Browse entire projects by subject (includes the complete example project, project overview and description, resources used, and all tutorials necessary to create your own project)
    • Save any tutorial, workshop, or project as a favorite for later
    • Assign anything you see to someone else by email, or share the video tutorial link with a friend

    Sounds good, sign me up!  Actually, you already have an account as long as you have a BVU ANGEL account.  After logging in to ANGEL (https://lms.bvu.edu), you will see a nugget for Atomic Learning on your homepage.  Simply click the button that says “Go to Atomic Learning” and you are in.  Play around, ask a question, or mark some favorites for later!

     
  • Adam Chown 3:01 PM on July 1, 2011 Permalink | Reply
    Tags: Adobe Media Encoder, ANGEL, H.264,   

    Slaying the Video Dragon 

    No, I’m not talking about grouping up to hunt world dragons in Azeroth, I’m talking about something much more intimidating:  uploading videos into ANGEL.  More specifically, uploading segments of movies or instructional videos.

    I have helped a lot of people upload video segments into ANGEL and I thought I’d share a bit of my thought process when I’m doing so.  I’ll also briefly explain what settings I like to use, and why I chose them.

    I almost always start by asking myself some questions:

    What is the source of the video? The most common instance is that I am given a DVD containing videos to upload.  To get the video off of the DVD, it needs to be ripped to a computer hard disk.  What’s nice about having the DVD is the ability to turn on subtitles and capture them for the purpose of accessibility.   Of course, if the video is already a file on a computer, then this step can be skipped.

    How big is the video going to be?  In some cases size can dictate the quality of a video.  If the instructor would like a forty-minute segment uploaded, some quality might have to be sacrificed.

    What devices are going to be used to view this video?  As you are probably aware, the iPad will be distributed to students and faculty next year.  Adding a new device can change the way videos need to be encoded.  For example, Windows Media Video (.WMV) files may not play on the iPad.

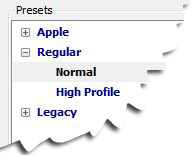
    Once I’ve answered these questions, my usual process is to rip the DVD video to hard disk by using the program Handbrake, which isHandbrake preset image a terrific (and free) program that I highly recommend.  What I prefer to do is rip a high quality version (using the “Normal” profile under the “Regular” preset, if you’re following with Handbrake open), which I will then use to make compressed versions with Adobe Media Encoder.  It is handy to have the high quality version in case I need to change some encoding settings.
    Adobe Media Encoder is installed on BVU’s laptops and is a great tool for compressing video.  I have a custom preset saved in Media Encoder to make things go more quickly.  Since most of the videos I’ve put into ANGEL have an aspect ratio of 4:3, which is a common non-widescreen format, I use the following settings (for those following along at home):

    Audio

    Codec: AACAdobe Media Encoder image
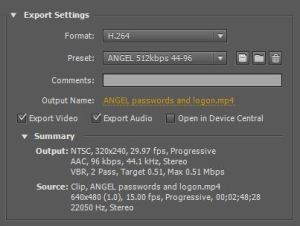
    Output Channels: Stereo
    Frequency: 44.1kHz
    Audio Quality: High
    Bitrate: 96 kbps

    Video

    Format: H.264
    Preset: Custom
    Frame Size: NTSC, 320 pixels x 240 pixels
    Frame Rate: 29.97
    Bitrate Encoding: 2 Pass encoding with target bitrate set to approximately .5 Mbps.  The maximum bitrate can be set to the same number or slightly larger.

    I believe we should have a high standard for the media in our courses, so I like to use stereo sound and a minimum video bitrate of .5 Mbps.  The audio bitrate of 96 kbps is not earth-shattering, but it’s most likely going to pleasant to listen to, especially if you have a lot of videos to watch.  Like I mentioned before, if the video is going to be a long one, the video bitrate may have to be lowered.  Media Encoder has a handy feature in that it estimates the file size of the video you are making, so you can play around with the bitrate setting to get an idea of how big it will be.

    Using the settings above will result in a video size of about 4.5MB per minute, so a 3 minute video would be around 13MB.  With today’s bandwidth, large video sizes are becoming less of a problem.  However, that doesn’t mean it’s a good idea to throw up a 500MB feature-length movie.  That’s when streaming, like how Netflix delivers movies, comes in…which is another topic altogether.

    We decided to use the H.264 codec for our videos because it looked to be the go-to codec for future development on the internet and it is friendly to mobile devices.  And being a higher education institution, we can use the H.264 codec royalty-free.

    Hopefully this sheds some light on the subject of video in ANGEL.  As usual, if you have any questions about a blog post, or you’d like to know more, feel free to contact the TLTC or stop by!

     
  • Chris Anderson 8:52 AM on June 20, 2011 Permalink | Reply
    Tags: interaction, QOMO   

    Utilizing QOMOs in the Online Classroom 

    Recently BVU has started utilizing QOMOs to enhance instruction and student/teacher interaction.  We want all of our students to be able to “watch” their professors work through the material they are presenting. The QOMO QIT30 is the perfect way for our online professors to capture their work and post it online.

    One of our early adopters is Professor of Accounting and Management, Courtney Berg. She states, “I really like the screen capture capabilities that it offers.” This is the beauty of the QOMO. We can capture still pictures and video to upload into the courses that we offer. Courtney continues, “I plan on using QOMO in the class to record other videos on common mistakes made on the homework during the week and other videos on how to complete the practice activities.”

    Courtney Berg has also been utilizing the QOMO for clarifying directions that have been troublesome in the past. “I have currently created a tutorial video on how to install a PDF printer in the software that comes with the text in my class. Student are required to turn in their assignments as a PDF and struggle every term with installing the PDF printer,” Berg states.

    To learn more about the QOMO visit, http://www.qomo.com/Product.aspx?ProductID=10.

     
  • Kayleen Grage 3:09 PM on June 10, 2011 Permalink | Reply
    Tags: collaboration, Google Docs   

    A Love Affair with Google Docs 

    I drank the Google Docs Kool-Aid.

    For years I put off trying Google Docs. I’d heard good things about it, how it could make life/work easier, blah blah blah, but didn’t think I had a valid reason to take the time to learn another new program/tool. It wasn’t until an instructor came to me and expressed interest in using it in her class that I actually looked at Google Docs seriously.

    What did I discover? I love it! It’s simple, and what I like to call “stupid easy” – ridiculously easy. I thought it would be complicated to use, but it definitely is not.

    As an example of how simple it is to use, one day my boss told me he heard you can make surveys with Google Docs and the results go straight into a spreadsheet. That’s pretty cool, I thought. So I opened up my Google account and less than 3 minutes later I had a silly 3-question “Form” sent out to colleagues. I didn’t use help guides or tutorials; it was intuitive.

    If you haven’t used Google Docs yet, check out the oldy but goody “Google Docs in Plain English” video (use the link or watch it below).

    Practical Examples

    To add practicality to this otherwise simple memoir, here are some of the best ways I’ve used Google Docs:

    • Avoid attachments. I made a list of workshops we’ve offered this year and sent the link to over a dozen people to get input on workshops their staff/faculty might want this summer.
    • Survey to gauge interest and make decisions. When we were starting this blog I set up a survey and sent it to my colleagues to decide what we should call the blog (voted on 15 possible names, whittled down from a much larger brainstorming list), who would be willing to write for it, and what topics they’d cover.
    • Schedule blog posts and other events. Continued from above, not only did the results of that survey name this blog, but they also helped me put together a schedule of who would be responsible for writing a blog post each week an on which topic.
    • Work-in-progress document. We upgraded to a newer version of an LMS and put together a list of changes and known issues. Since the document would change as new issues/changes were discovered, a static attachment to an email would not suffice. We also needed multiple people to be able to edit it without passing an email back and forth.
    • Co-author an eBook. Several of us in my office recently used it to write an eBook. That’s right, we wrote the eBook simultaneously which was super efficient. We could all work on our different parts and review each others’ work quickly and easily. (Be on the lookout for a future blog post about this process!)

    So, I’d encourage you to give Google Docs a try. You might also be surprised at how easy it is and how much time and energy it can save you and your colleagues. The possibilities (well, variations anyway) are limitless!

    Other Resources:

     
  • Melissa Huntley 3:54 PM on May 26, 2011 Permalink | Reply
    Tags: ABC, app, iLoader, , iStudiez Pro, Kayak, Mint   

    Melissa’s Choice: Five iPad Apps 

    The iPad has been a super fun tool to play with these past couple of months and has done what no other piece of technology could fulfill since I got a laptop years ago. It has inspired me to see the world in a different and more interactive way which encourages me to explore it in an Indiana Jones-like fashion. Like most other students, my adventuring tools are under a strict budget, but everyone should splurge for an essential or two (free fedoras are difficult to come by). Here’s my cream of the crop.

    Cover ArtiStudiez Pro – $2.99
    This is one of those essentials, especially for persons of a studious nature. If we were to stick with the Indy theme, this would be the whip of the iPad world. Since this was designed for students, you can build semesters ahead and view homework and project deadlines in a variety of ways, including by class, date, and priority. A nice little bonus is the holiday button, where you can just go in and cancel a class without having to deal with the entire scheduling logarithm. There’s an accompanying grading feature that remained shrouded to me, but given more time I would probably have enjoyed utilizing it just as well as the scheduling.

    Cover ArtMint – free
    As a student/pseudo-archaeologist adventurer, it’s important to know where your finances lie and what they are doing when you’re not watching. Mint is a secure budgeting website that allows you to link your accounts together in an attempt to see the bigger (in my case depressing) picture. It automatically keeps track of your purchases and their categories (e.g., groceries, weapons, gas, ransom payments, etc.) and even has completely customizable budget builders so you can see the dismal differences between how you want to spend your hard earned moolah and how you actually spend it.

    Nazis causing problems? I'm on it!

    Cover ArtKayak – free
    No archaeological action hero buys plane tickets at the counter. That’s just silly. Kayak is a well-kept secret that searches all of the big name comparison sites (Expedia, Priceline, Travelocity) for flights, hotels, and car rentals. Kayak’s real power lies in its flight search function, which may be the most beautiful thing I’ve ever seen. Keeping App #2 in mind, my filter is always set by price, so Kayak makes it easy for me to see times and flight numbers. It also has no connection limit (some airlines will not sell a single flight with more than 2 or 3 connections). The Kayak App also allows you to save past searches and keeps them updated, so if I get wind of some ancient artifact, I can get there this weekend on a few dimes (Disclaimer: may be slightly more than a few dimes).

    Cover ArtiLoaderHD – $2.99
    With all of my glamorous adventures, it is understandable that I would have dozens of pictures to share with the world of the exotic locations I frequent. I love working with pictures on the iPad and it’s pretty decent surfing Facebook, but the marriage between these two is still in counseling. Uploading a picture to FB from the iPad is still not possible without a third party app (there are some Facebook Apps out there, but I find them to be alarmingly clunky when the site works so well in Safari). The only reason I chose the upgrade to this from the free lite version is that if I want to upload an album, I do not have any patience to do it one picture at a time.

    Cover ArtABC Player – Free
    Every pseudo-archeologist needs to relax with some good ol’ TV. There have been several praises thrown to the Netflix App, but it’s pretty useless without a paid account. In order to keep up on my stories, I grabbed the ABC player pretty early on (due to a shameful obsession with Nathan Fillion’s Castle). Shows appear on the app the day after they air on the network and episode teasers abound. The player itself is sharp and often faster on start-up than Netflix, but unfortunately comes with commercial breaks, but I can sit through a 30-second Hallmark ad if it means I get to see Nate’s feathery hair.

     
c
Compose new post
j
Next post/Next comment
k
Previous post/Previous comment
r
Reply
e
Edit
o
Show/Hide comments
t
Go to top
l
Go to login
h
Show/Hide help
shift + esc
Cancel